
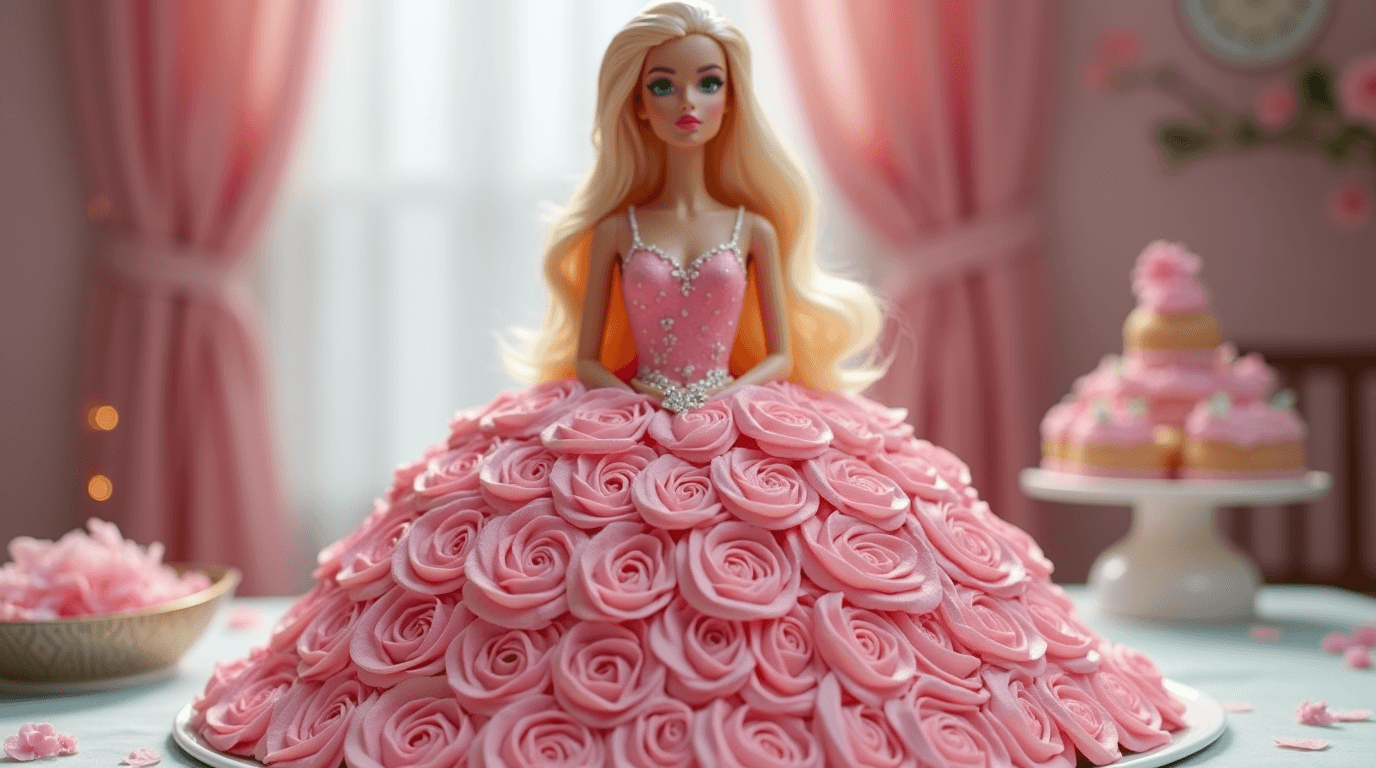
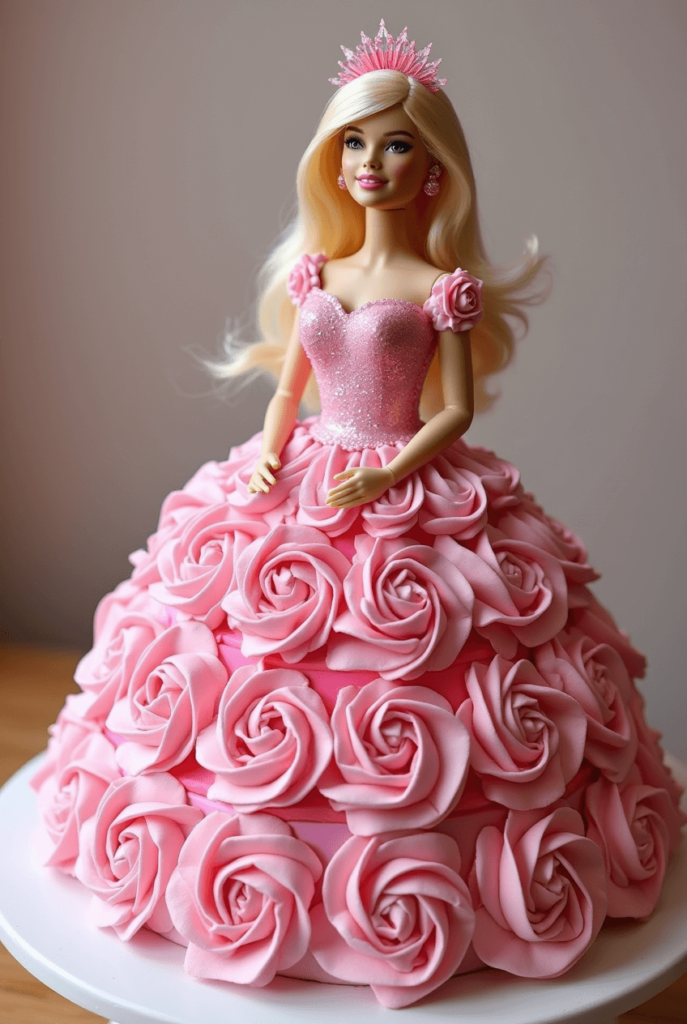
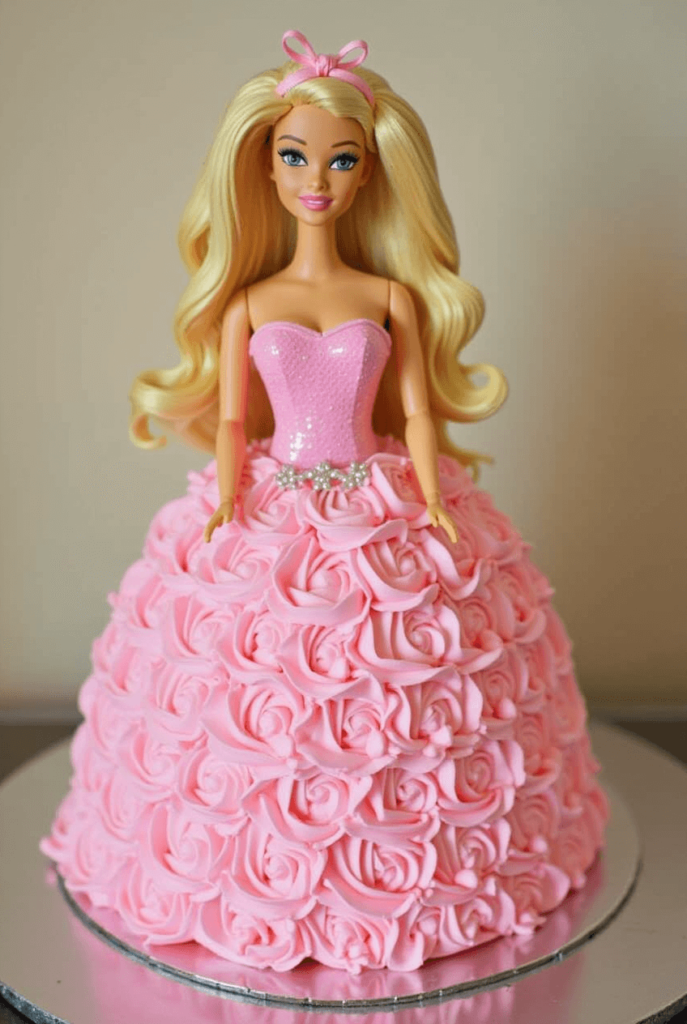
Have you ever watched a little one’s face light up at the sight of a Barbie doll cake? It’s pure magic—and surprisingly easy to create at home! Whether you’re planning a princess-themed party, a sweet surprise for your child, or just love a good DIY baking project, this cake is a showstopper that doubles as the ultimate centerpiece.
I’ve always believed that cakes should be as fun to make as they are to eat, and this one hits the mark. With a few simple tools and a dash of creativity, you’ll transform basic ingredients into a layered doll cake masterpiece—complete with a stunning edible gown that looks like it stepped out of a fairy tale.
If you’re new to sculpted cakes or just want a birthday cake idea for girls that truly wows, you’re in the right place. Let’s dive in and bring this Barbie cake dream to life!
Table of Contents
1. Key Benefits of Making a Barbie Doll Cake
Making a Barbie doll cake isn’t just about baking—it’s about creating a magical moment. Whether you’re a seasoned baker or just dipping your toes into the world of DIY birthday cakes, this project offers plenty of sweet rewards beyond the frosting.
Here’s why you’ll love making this show-stopping cake:
It’s the Ultimate Party Centerpiece
A Barbie doll cake instantly becomes the star of any girl’s birthday party.
The dramatic dress design draws oohs and aahs before anyone takes a bite.
Surprisingly Easy to Assemble
You don’t need professional tools—just a few basic pans and a little patience.
With the right steps (don’t worry, I’ve got you!), you can layer, carve, and decorate like a pro.
Totally Customizable
Pick your little one’s favorite cake flavor—vanilla, chocolate, strawberry—you name it.
Match the dress colors to a party theme using food coloring or fondant.
Fun and Creative for All Ages
Get kids involved with mixing, frosting, or choosing dress colors.
A perfect introduction to themed cake decorating for beginner bakers.
Creates Lasting Memories
More than just dessert, this cake is a personal experience they’ll never forget.
It’s a heartfelt way to show you care—and a memory-maker that photographs beautifully.
Whether you’re going for Barbie cake magic or just want something a little more playful than a regular round cake, this is one of those rare recipes that combines creativity, fun, and flavor all in one go. And the best part? You don’t have to be a professional to make it look amazing.
2. Ingredients for the Best Barbie Doll Cake
Now that you’re excited to make this fun and fabulous Barbie doll cake, let’s gather everything you’ll need to bring this creation to life. The ingredients are simple, but they work together to create a stunning, delicious cake that will leave everyone amazed!
Here’s your shopping list:
For the Cake:
- 2 boxes of cake mix (or your favorite homemade sponge cake recipe)
- Choose vanilla or chocolate—or both for a layered effect!
- Eggs, oil, and water (as per your cake mix instructions)
- 1/2 cup of all-purpose flour (if you’re making the cake from scratch)
- Baking soda & powder (to ensure your cake is light and fluffy)
- Vanilla extract (for an extra depth of flavor)
Tip: If you’re using cake mix, feel free to add a little extra vanilla extract to elevate the flavor. This simple tweak makes a big difference!
For the Frosting:
- 2 cups of unsalted butter (softened to room temperature)
- 4 cups powdered sugar (sifted to avoid lumps)
- 2 teaspoons vanilla extract
- 2-3 tablespoons heavy cream (for the right consistency)
- Food coloring (for the dress! Think pink, purple, or any party theme colors)
Pro Tip: For a richer, more stable frosting, you can use a combination of buttercream and cream cheese for a slight tang that pairs beautifully with the sweet cake.
For Decorating the Doll:
- Barbie doll (food-safe) or similar plastic doll
- Make sure it’s wrapped in plastic wrap or wax paper to keep it safe from the frosting.
- Make sure it’s wrapped in plastic wrap or wax paper to keep it safe from the frosting.
- Fondant (optional for extra fancy decorations)
- Fondant is great if you want to create smooth, clean-looking dresses or details.
- Fondant is great if you want to create smooth, clean-looking dresses or details.
- Cake dowels or skewers (for stability when assembling)
Optional Extras for Added Flair:
- Edible glitter or sprinkles (to make the dress sparkle!)
- Edible flowers or themed cake toppers
- Mini candy pearls for the dress or the base of the cake
Now that you’ve got all your ingredients lined up, it’s time to dive in and start baking! In the next section, I’ll guide you through each step, ensuring that this Barbie cake becomes the star of your party.
3. Instructions: How to Make Your Barbie Doll Cake
Alright, now it’s time to bring this Barbie doll cake to life! Don’t worry, this step-by-step guide will make the process smooth and stress-free. By the end, you’ll have a gorgeous, fun, and delicious cake that’s sure to impress!
Step 1: Bake the Cake Layers
- Preheat your oven to the temperature suggested on your cake mix box (typically around 350°F or 175°C).
- Prepare your cake pans: Use two 9-inch round cake pans for the base and a small, dome-shaped pan (if you have one) for the Barbie’s dress.
- Mix the batter: Follow the instructions on your cake mix box, or if you’re making it from scratch, combine your dry ingredients, wet ingredients, and mix until smooth.
- Pour and bake: Divide the batter between the pans, ensuring they’re even. Bake the layers until a toothpick inserted into the center comes out clean—usually about 25-30 minutes.
- Cool: Let the cakes cool in the pans for about 10 minutes, then transfer them to wire racks to cool completely.
Step 2: Prepare the Barbie Doll
- Wrap the Barbie: While the cakes cool, wrap your Barbie doll (or similar figurine) in plastic wrap from the waist down to keep her clean and food-safe.
- Trim the doll’s legs: If needed, trim the legs of the doll so she fits neatly into the cake. Just make sure she’s not too tall!
- Insert a cake dowel or skewer: Stick a dowel into the base of the doll (through the bottom of her feet). This will help hold the doll securely when you assemble the cake layers.
Step 3: Assemble the Cake
- Level the cake layers: Use a serrated knife to level off the tops of your cooled cakes so they’re even. This will make stacking easier.
- Cut a hole for the Barbie: In the center of one of your cake layers, carefully cut a hole wide enough to fit the Barbie’s waist. Be gentle to avoid breaking the cake.
- Stack the layers: Place the first cake layer on a cake board or serving plate. Spread a layer of frosting on top of it. Then, add the second layer and frost it too. If you have a dome-shaped pan, this is where the dress layer will go.
- Insert the Barbie: Gently push the wrapped Barbie into the center hole of the cake, ensuring she’s securely placed. If the hole is too large, trim the cake slightly to fit.
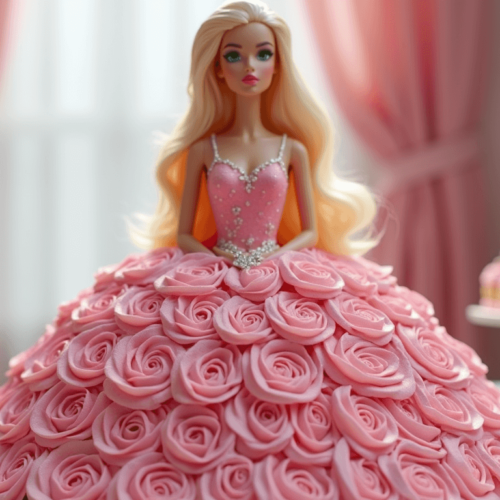
Step 4: Frost and Decorate the Dress
- Frost the body and dress: Start by frosting the top of the cake where the Barbie’s torso is. For the skirt, begin applying frosting to the bottom part of the Barbie. Work your way down, shaping the frosting into a flowing dress. This is your chance to get creative!
- Smooth the frosting: Use an offset spatula to smooth out the frosting as you go. If you prefer a clean look, use fondant to cover the skirt for a polished finish.
- Add color and details: If you’re using food coloring, now’s the time to tint the frosting to match your theme. You can even add some edible glitter, sprinkles, or candy pearls to make the dress sparkle.
Step 5: Finishing Touches
- Decorate the base: Add frosting or fondant to the base of the cake to cover the edges and make it look neat. You can also add extra decorative touches like mini candy flowers or more edible glitter.
- Chill the cake: Let the cake chill in the fridge for about 30 minutes before serving. This will help everything set in place.
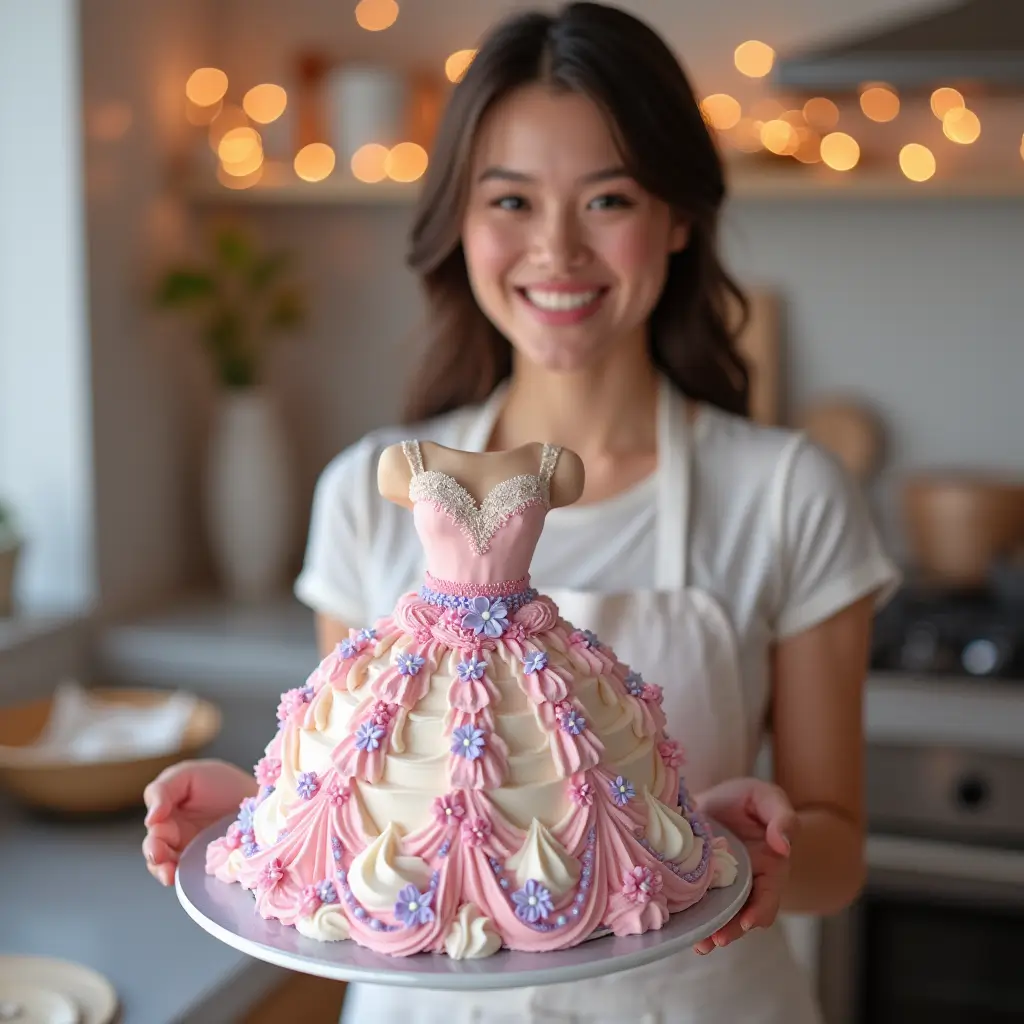
And there you have it! Your Barbie doll cake is ready to steal the show. With a little creativity and some careful steps, you’ve turned a simple cake into a magical, edible masterpiece. Ready to share this beauty with your guests?
4. Pro Tips and Variations
You’ve baked, stacked, and styled your Barbie doll cake—now let’s level it up with some pro tricks and creative twists to make it truly unforgettable. Whether you’re customizing the flavor or aiming for a show-stopping design, these tips will help you bake like a cake artist (without the stress).
Pro Tips for a Flawless Finish
Freeze your cake layers before carving.
Slightly frozen cake is firmer and easier to shape, especially when you’re creating that dress silhouette.
Use a crumb coat.
Apply a thin layer of frosting first (called a crumb coat) and chill the cake for 15–20 minutes. This locks in stray crumbs and gives you a clean surface for final decorating.
Create texture with piping tips.
Want ruffles or roses? Use star or petal tips to pipe buttercream details onto the dress. Even simple swirls make a big impact!
Support with dowels.
If your cake has multiple tall layers, insert a few cake dowels or skewers through the center for added stability—especially important if you’re transporting the cake.
Smooth fondant like a pro.
If you’re using fondant for the skirt, roll it out evenly and dust your surface with cornstarch to prevent sticking. Gently drape and smooth with your hands or a fondant tool.
Fun Variations to Try
Flavor it up!
Switch things up with flavors like strawberry shortcake, funfetti, or red velvet. A layered mix of colors inside can create a surprise reveal when sliced.
Go beyond Barbie.
Swap in any favorite doll to match the birthday theme—think princesses, fairies, or even a superhero with a custom fondant cape!
Color-block the dress.
Use two or more colors of frosting to create a tiered or ombré gown effect. It’s a simple way to make the cake look super elegant with minimal effort.
Add edible accessories.
Tiny fondant bows, sugar pearls, or even piped buttercream necklaces give your doll cake that little something extra.
These pro tips and creative variations make it easy to personalize your Barbie cake for any celebration. Don’t be afraid to experiment—because half the fun is in the decorating! Whether you’re keeping it simple or going full fairytale glam, your cake is guaranteed to be a hit.
5. Serving Suggestions for Your Barbie Doll Cake
You’ve put your heart (and frosting skills!) into making this stunning Barbie doll cake, so let’s talk about how to serve it up in a way that keeps the wow-factor going right until the very last bite. Presentation and timing are everything, especially when this cake is the centerpiece of your celebration.
When and How to Serve
- Serve at room temperature.
Buttercream or fondant-covered cakes taste best when they’ve had about 30 minutes out of the fridge. The frosting softens just enough, and the texture is perfect for slicing. - Make it the grand finale.
Save the Barbie cake reveal for last—it’s guaranteed to steal the spotlight! Dim the lights, light the candles, and let the magic unfold. - Slice from the back first.
Once you’re ready to serve, gently remove the doll (twist and pull upward), then begin slicing the cake from the back or side of the skirt. This keeps the front looking photo-ready for a little longer.
Pairings That Make It Even Better
- With ice cream – A scoop of classic vanilla or strawberry pairs perfectly with most cake flavors.
- Add a fruit tray – Bright berries, melon slices, or pineapple offer a fresh contrast to the sweet cake.
- Themed drinks – Pink lemonade, fruit punch, or even a DIY “Barbie mocktail” in fancy cups keep the theme going strong.
Don’t Forget the Photo Op!
- Set the cake on a pedestal stand for a real “wow” factor.
- Snap a few pics before cutting—the cake itself becomes a memory!
- Add themed decorations around the base like flowers, confetti, or a glittery cake topper to tie everything together.
Serving your Barbie birthday cake isn’t just about cutting slices—it’s about creating an experience. Whether it’s the smile on your child’s face or the excited gasps from guests, this cake is a celebration in itself. Make it shine from start to finish, and don’t forget to enjoy a slice too—you’ve earned it!
6. Conclusion
Creating a Barbie doll cake isn’t just about baking—it’s about crafting a magical moment that brings big smiles and even bigger memories. Whether you’re planning a birthday bash, a princess-themed party, or just surprising your little one with a sweet treat, this cake is a showstopper that’s as fun to make as it is to serve.
From choosing the perfect cake flavors to styling a dress that dazzles, you’ve now got the tools (and tips!) to make it all come together beautifully. And the best part? You don’t need to be a pro baker to pull it off. Just a little patience, a splash of creativity, and the willingness to have fun in the kitchen.
So go ahead—bake that cake, frost that gown, and celebrate like only Barbie would: with sparkle, sweetness, and lots of love.
And if your first cake isn’t perfect? That’s okay! Each attempt is another chance to play, learn, and enjoy the process. After all, isn’t that what the best recipes are all about?
Keep that apron handy—you’re officially ready for more cake adventures!
How to make a best Barbie doll cake
Ingredients
For the Cake:
- 2 boxes of cake mix or your favorite homemade sponge cake recipe
- Choose vanilla or chocolate—or both for a layered effect!
- Eggs oil, and water (as per your cake mix instructions)
- 1/2 cup of all-purpose flour if you’re making the cake from scratch
- Baking soda & powder to ensure your cake is light and fluffy
- Vanilla extract for an extra depth of flavor
For the Frosting:
- 2 cups of unsalted butter softened to room temperature
- 4 cups powdered sugar sifted to avoid lumps
- 2 teaspoons vanilla extract
- 2-3 tablespoons heavy cream for the right consistency
- Food coloring for the dress! Think pink, purple, or any party theme colors
For Decorating the Doll:
- Barbie doll food-safe or similar plastic doll
- Make sure it’s wrapped in plastic wrap or wax paper to keep it safe from the frosting.
- Fondant optional for extra fancy decorations
- Fondant is great if you want to create smooth clean-looking dresses or details.
- Cake dowels or skewers for stability when assembling
- Optional Extras for Added Flair:
- Edible glitter or sprinkles to make the dress sparkle!
- Edible flowers or themed cake toppers
- Mini candy pearls for the dress or the base of the cake
Instructions
Step 1: Bake the Cake Layers
- Preheat your oven to the temperature suggested on your cake mix box (typically around 350°F or 175°C).
- Prepare your cake pans: Use two 9-inch round cake pans for the base and a small, dome-shaped pan (if you have one) for the Barbie’s dress.
- Mix the batter: Follow the instructions on your cake mix box, or if you’re making it from scratch, combine your dry ingredients, wet ingredients, and mix until smooth.
- Pour and bake: Divide the batter between the pans, ensuring they’re even. Bake the layers until a toothpick inserted into the center comes out clean—usually about 25-30 minutes.
- Cool: Let the cakes cool in the pans for about 10 minutes, then transfer them to wire racks to cool completely.
Step 2: Prepare the Barbie Doll
- Wrap the Barbie: While the cakes cool, wrap your Barbie doll (or similar figurine) in plastic wrap from the waist down to keep her clean and food-safe.
- Trim the doll’s legs: If needed, trim the legs of the doll so she fits neatly into the cake. Just make sure she’s not too tall!
- Insert a cake dowel or skewer: Stick a dowel into the base of the doll (through the bottom of her feet). This will help hold the doll securely when you assemble the cake layers.
Step 3: Assemble the Cake
- Level the cake layers: Use a serrated knife to level off the tops of your cooled cakes so they’re even. This will make stacking easier.
- Cut a hole for the Barbie: In the center of one of your cake layers, carefully cut a hole wide enough to fit the Barbie’s waist. Be gentle to avoid breaking the cake.
- Stack the layers: Place the first cake layer on a cake board or serving plate. Spread a layer of frosting on top of it. Then, add the second layer and frost it too. If you have a dome-shaped pan, this is where the dress layer will go.
- Insert the Barbie: Gently push the wrapped Barbie into the center hole of the cake, ensuring she’s securely placed. If the hole is too large, trim the cake slightly to fit.
Step 4: Frost and Decorate the Dress
- Frost the body and dress: Start by frosting the top of the cake where the Barbie’s torso is. For the skirt, begin applying frosting to the bottom part of the Barbie. Work your way down, shaping the frosting into a flowing dress. This is your chance to get creative!
- Smooth the frosting: Use an offset spatula to smooth out the frosting as you go. If you prefer a clean look, use fondant to cover the skirt for a polished finish.
- Add color and details: If you’re using food coloring, now’s the time to tint the frosting to match your theme. You can even add some edible glitter, sprinkles, or candy pearls to make the dress sparkle.
Step 5: Finishing Touches
- Decorate the base: Add frosting or fondant to the base of the cake to cover the edges and make it look neat. You can also add extra decorative touches like mini candy flowers or more edible glitter.
- Chill the cake: Let the cake chill in the fridge for about 30 minutes before serving. This will help everything set in place.
Notes
📋 Recipe Details
- Prep Time: 45 minutes
- Cook Time: 55 minutes
- Total Time: 2 hours (plus cooling and decorating time)
- Servings: 12 slices
- Calories: ~420 kcal per serving (may vary based on frosting type and portion size)
🍽️ Nutrition Information (Per Serving)
| Nutrient | Amount |
| Calories | 420 kcal |
| Total Fat | 20g |
| Saturated Fat | 12g |
| Carbohydrates | 58g |
| Sugars | 42g |
| Protein | 4g |
| Fiber | 1g |
| Sodium | 220mg |
| Cholesterol | 70mg |
7. FAQs
1. What type of cake is best for a Barbie cake?
Dense cakes like vanilla pound cake, chocolate fudge, or butter cake work best. They’re sturdy enough to hold their shape and support the layers.
2. Can I use a real Barbie doll inside the cake?
Yes, you can! Just make sure to wrap the doll’s lower half in plastic wrap for hygiene. Alternatively, use a doll pick (a torso-only doll made for cakes) for ease.
3. Do I need a special pan for the dress shape?
A domed cake pan or oven-safe glass bowl works perfectly to shape the dress. If you don’t have one, you can carve the shape from stacked round layers using a serrated knife.
4. How far in advance can I make a Barbie cake?
You can bake the cake layers 1–2 days in advance and wrap them tightly in plastic. Assemble and decorate the day before the party, then store in the fridge to keep it fresh.
5. How do I prevent the cake from collapsing?
Use support dowels if you’re stacking multiple layers, and don’t skip the crumb coat—it helps the cake hold its structure and keeps the frosting smooth.
6. Can I use fondant instead of buttercream?
Absolutely! Fondant gives a sleek, professional finish and is great for sculpting dress details. Just make sure to apply a thin layer of buttercream underneath so it sticks well.
7. What’s the best way to transport a Barbie doll cake?
Place the cake on a sturdy cake board, and transport it in a cake carrier or deep box with a non-slip mat underneath. Drive carefully and keep the cake cool to avoid melting.
Whether this is your first time making a Barbie birthday cake or your fifth, these tips will help you troubleshoot like a pro and serve up a dessert that’s not only gorgeous—but unforgettable too!